Plans for this evening.
I have been bad at blogging this week. I haven't had photo's to show of anything, and I like having photo's to back up what im writing.I joined the Guild of Weavers Spinners and dyers recently, and even though I haven't gotten confirmation from them yet that I'm a member, my cheque has been drawn down and thats good enough for me!
I contacted Holly to see if I could borrow the Guilds drum carder, even for a few days (Holly myself and Cheryl all have fleeces we want to card, and technically Cheryl was to get the drum carder next-Cheryl if you want it, let me know and I can drop it over to you!)
Cheryl was on holidays at this stage so I thought I may be able to get a few days in with it.
Its a fairly simple process, and seems to draw you into the process until next thing you know, an hour has gone by. Its a case of "I'll do one more batch and then I'll give it a rest" and then one more batch becomes half a fleece and next thing you know you have a pile of carded fleece!
Of course I didn't get that far last night, but I thought you may like to have a look at the process.
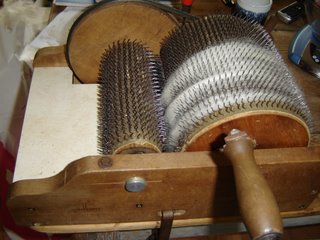
This is the drum carder.
 I have been watching one for sale on ebay at the moment and its currently at $222, which is just under €180.
I'm not going to try and bid on it, its just interesting to see what it will go for.
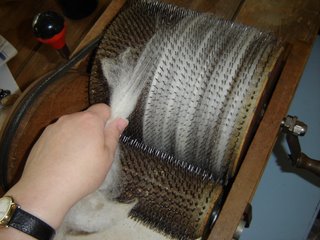
So to start off drum carding, you lay a small bit of your fleece on the spikes, and turn the handle so it catches the fleece and pulls it along, straightens it out.
 I have been letting it go with the flow, not forcing it and doing a small bit at a time.
I find that if you have a larger wedge of fleece in your hand, it gets caught on the smaller spiky bit
(technical terms may be edited at a later date)
(Handle is a correct technical term-- I know THAT much!)
Keep adding to it so that the whole of the larger spiky bit is covered and the thickness is up to the end of the spikes . I may do close-ups at a later date to show this.
When you are ready to, lift the carded fleece off, use the red pointy thing (Cheryl's technical terminology-as good as mine methinks) and bring up a little bit of a time, so that it seperates. Again I think I will be editing this at a later date to throw a photo in here to show what I mean.
Keep lifting off across the width of the drum carder and turn the handle counter clockwise as you do so. You will be going back against the direction of the spikes.
The red pointy thing will help lift this off, being very careful that the carding cloth isn't caught with it as it will tear and is expensive to replace.
So keep lifting and turning and using the red pointy thing, and eventually this is what you'll have.
This will need to come through the drum carder one more time or even twice if its still not to my satisfaction. As you can see, its still got flecks of VM (vegetable matter)in it, these were so small that they were hard to get out but I'll get them, the little b****rs!

I think a session of Kool-aid dying may be the recipe for Saturday...
In the meantime, I'm on a half day from work today, an old friend is calling round for lunch, and another one is calling round after that for coffee, as she can't make lunch. This evening I'll be left to my own devices as Micheál is being brought out to dinner with work for all the hard work he's been doing, so it'll be more carding for me!!
Oh the excitement, I can't wait!


3 Comments:
Fantastic - thanks for all that info - it's exactly in my terminology too. Looks enticing - can see how ye have all been drawn in - very excited to see the next stage - which is dying - right? Hope you enjoy your weekend.
Well done. Looks like a new profession to me in the works. Fiber Processor!! Even the little bits won't survive the wrath of Sara.
Kool-Aid dyeing! Now your talking my language.LOL I love Ebay but boy it's addictive sometimes.
Post a Comment
<< Home